Defensive Shape Transition Play When Pressed
Master the art of breaking high presses by teaching your team to transition defensively into a compact shape and play out from the back with confidence.
Equipment Needed
Overview
Modern football frequently demands that teams build out from the back, even when facing an aggressive high press. This set play resource is designed to teach your squad how to seamlessly transition their defensive shape to absorb pressure, draw the opposition in, and exploit the spaces left behind. By mastering this transition, your team can turn defensive vulnerability into a lethal attacking opportunity.
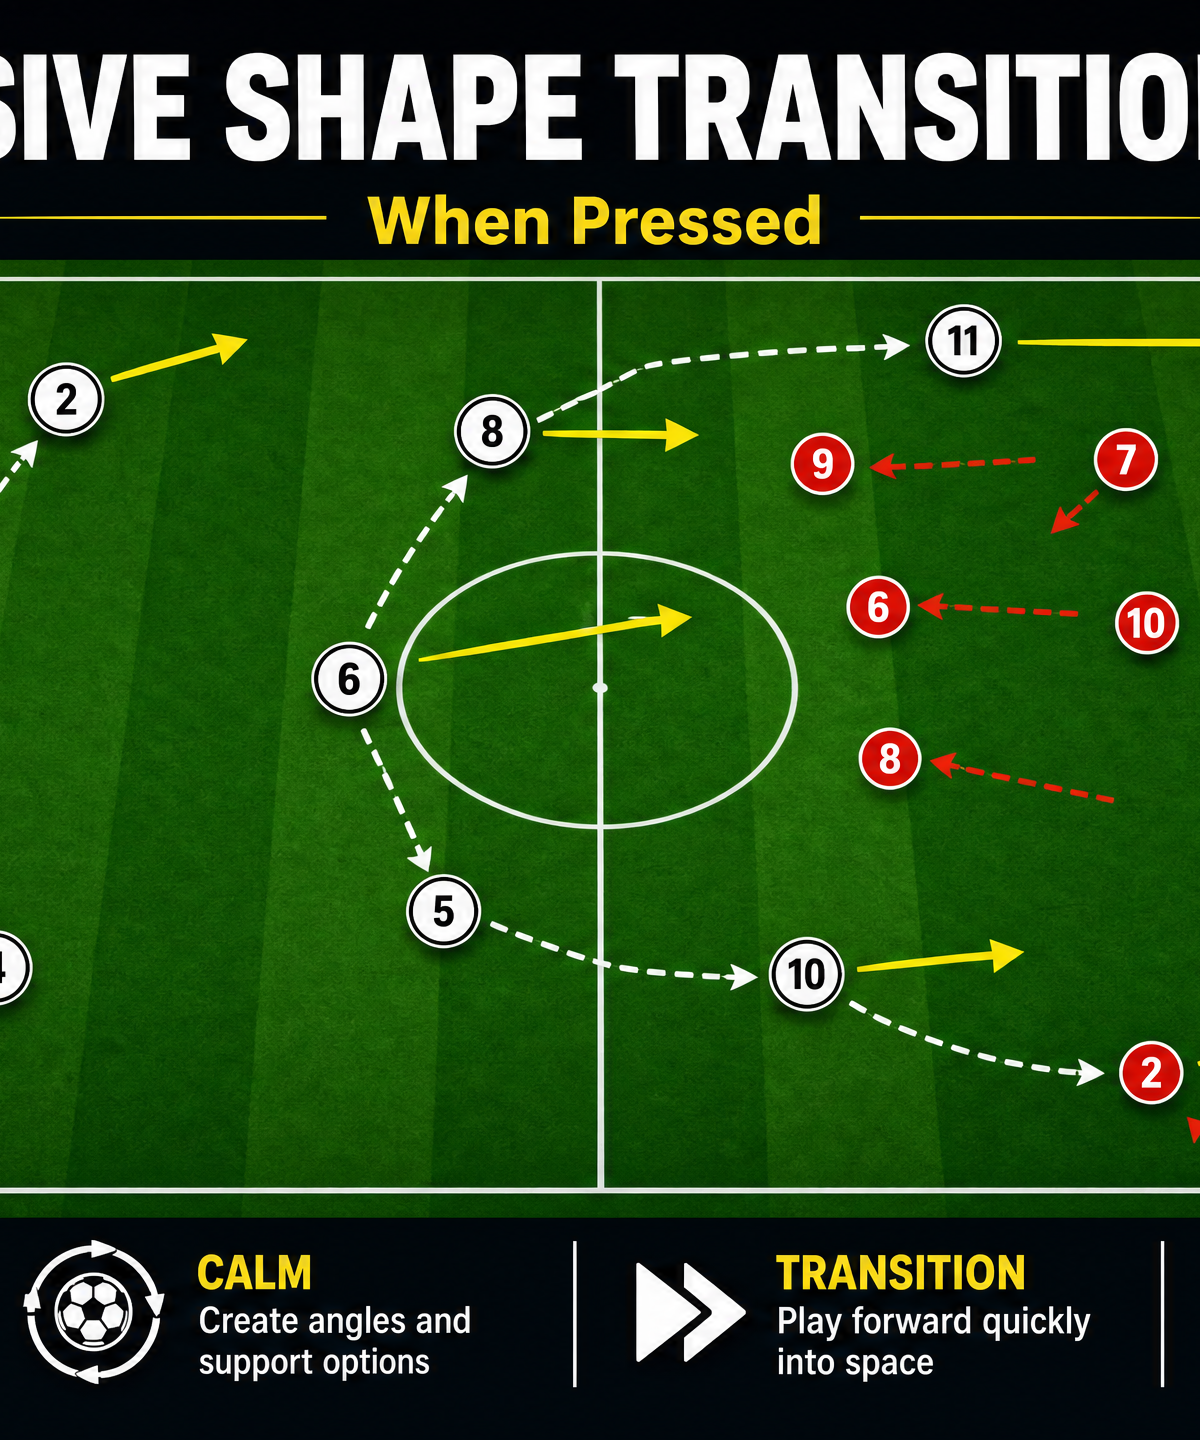
Use this routine when your opponents commit three or more players high up the pitch, attempting to lock you into your defensive third. It establishes clear passing lanes and triggers coordinated off-the-ball movements that bypass the initial wave of pressure.
Setup
- Pitch Area: Defensive half of a standard pitch (approximately 50m x 70m), extending just past the halfway line.
- Players Required: 11 (Focusing heavily on the GK, Back 4, and deep midfielders).
- Equipment: 10-12 cones to mark press trap zones, bibs for two teams (defending and pressing), and a supply of footballs in the goal.
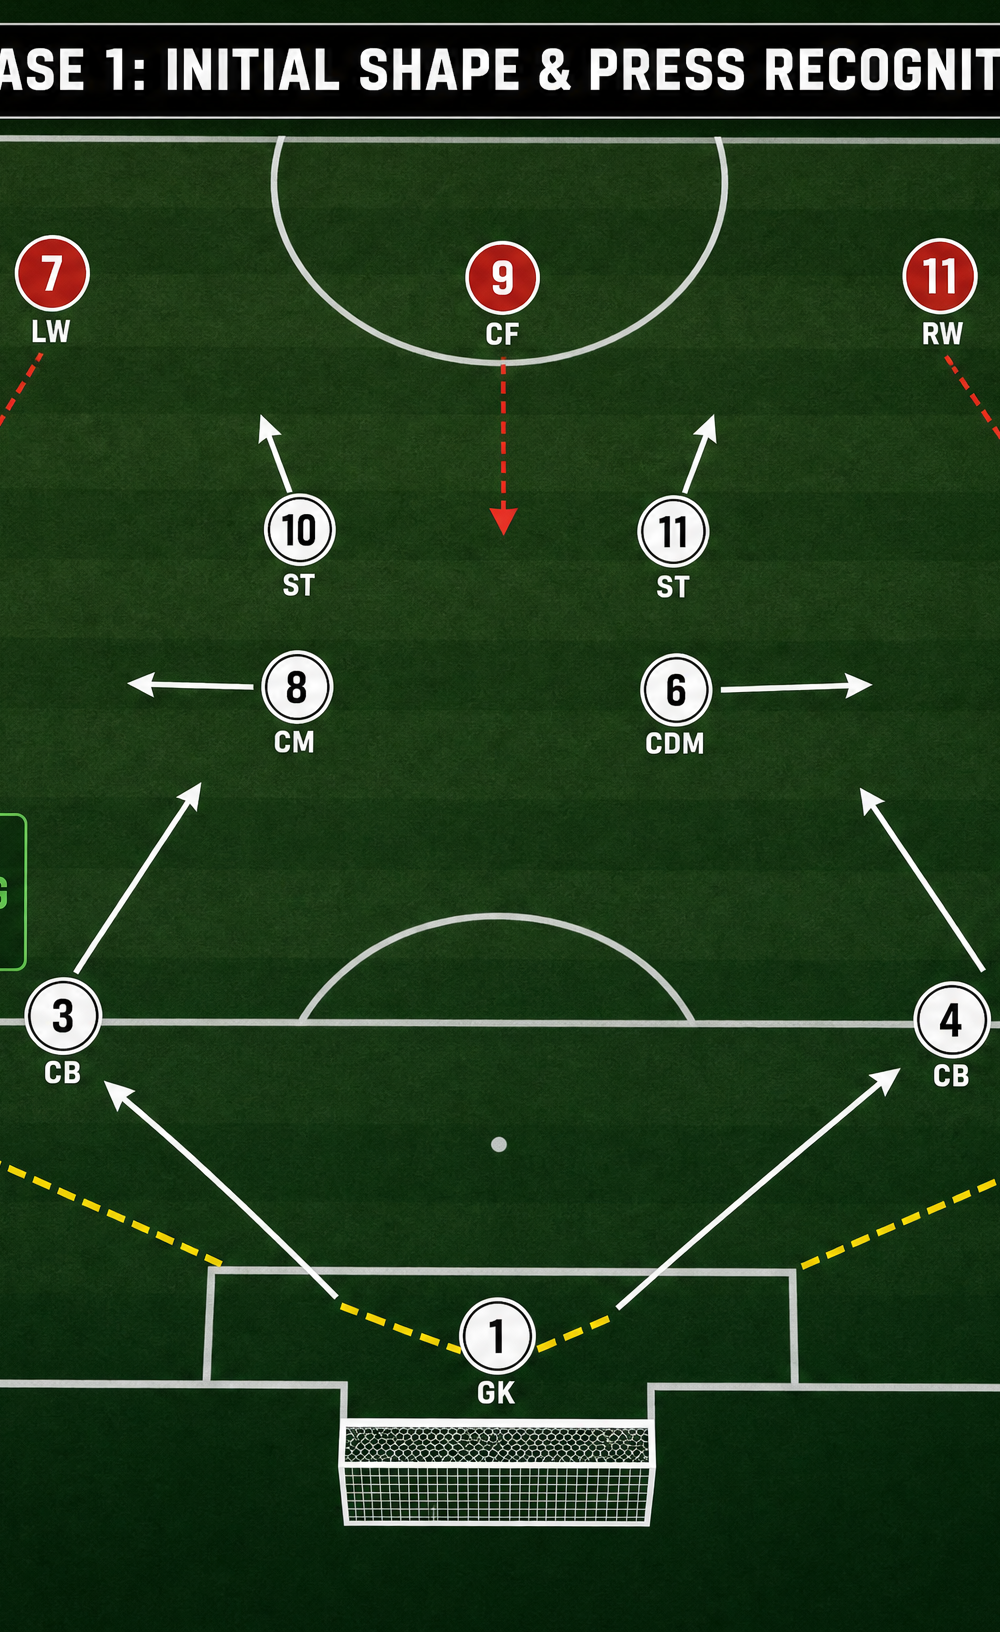
- Initial Positioning: The team sets up in a structured 4-4-2 or 4-2-3-1 defensive block. The Goalkeeper (1) starts with the ball. Center Backs (3 & 4) split to the edges of the penalty box. Fullbacks (2 & 5) push slightly higher and wider. The Central Defensive Midfielder (6) hovers centrally, ready to drop into the space between the Center Backs.
Step-by-Step Instructions
Phase 1: Initial Shape & Press Recognition
- Trigger the Play: The Goalkeeper (1) places the ball for a goal kick or receives a back-pass, immediately signaling the Center Backs (3 & 4) to split wide.
- Draw the Press: The Goalkeeper holds possession slightly longer than usual to invite the opposing forwards to commit to the press.
- Establish Passing Lanes: As the press arrives, the Fullbacks (2 & 5) push up the touchlines. The Central Defensive Midfielder (6) drops centrally to create a diamond shape with the GK and CBs, offering a crucial pivot option.
- The First Pass: The Goalkeeper plays a crisp, grounded pass to the Center Back (4) on the side where the press is slightly weaker or less organized.
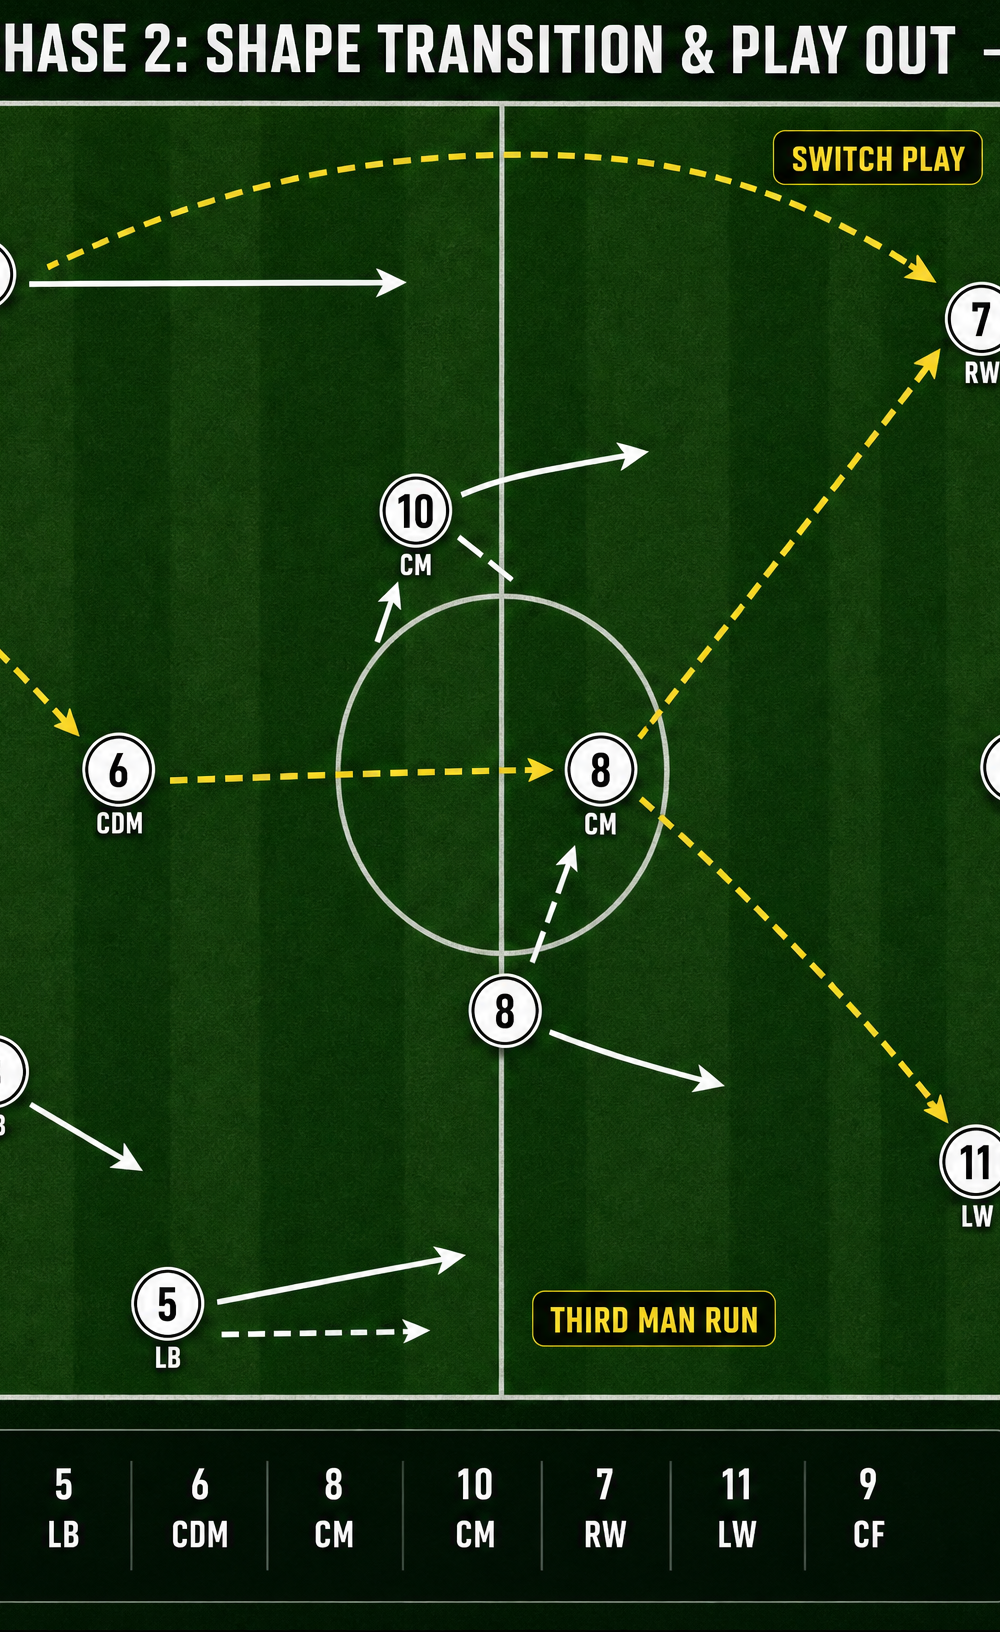
Phase 2: Shape Transition & Play Out
- Attract and Shift: Center Back (4) receives on the half-turn, taking a touch forward to attract the pressing winger or striker.
- The Pivot: Before the pressure arrives, Center Back (4) plays a firm pass centrally to the dropping Central Defensive Midfielder (6).
- Third Man Run: As the ball travels to the CDM (6), the Central Midfielder (8) makes a pre-planned "third man run" into the space vacated by the pressing opposition.
- Exploit the Space: The CDM (6) plays a one-touch pass out to the advancing Fullback (2) or directly into the path of the Central Midfielder (8), effectively bypassing the initial line of pressure.
- Transition to Attack: With the press broken, the team quickly transitions into an attacking shape, utilizing the numerical advantage in the midfield to drive toward the opponent's goal.
Key Coaching Points
- Patience on the Ball: The Goalkeeper and Center Backs must be comfortable holding the ball to draw the opposition in. Rushing the first pass defeats the purpose of the play.
- Body Shape: Players receiving the ball must adopt an open body shape (receiving on the back foot) to see the entire pitch and their next passing option before the ball arrives.
- Speed of Play: Once the initial press is committed, the sequence of passes (CB to CDM to CM/FB) must be executed with high speed and precision (one or two touches maximum).
- Communication: Verbal and non-verbal cues are critical. The Goalkeeper must dictate the starting shape, and the CDM must demand the ball when the passing lane opens.
- Movement Off the Ball: The success of the "third man run" relies on the Central Midfielder anticipating the pass to the CDM and moving into space early.
Common Mistakes
- Panic Clearances: Defenders feeling the pressure and aimlessly clearing the ball long, surrendering possession immediately.
- Static Midfielders: The CDM or CM failing to move into passing lanes, leaving the Center Backs isolated and forcing a turnover in a dangerous area.
- Poor Pass Weight: Under-hitting the pass to the CDM, allowing the pressing forward to intercept and create a direct goal-scoring opportunity.
- Closing the Angles: Fullbacks staying too deep and narrow, congesting the space and making it easier for the opposition to press effectively.
Variations & Progressions
- Progression 1 (Adding Pressure): Start with passive pressure (shadow defending) and gradually increase to full, live pressure from 3, then 4, attacking players.
- Progression 2 (Target Zones): Place mini-goals or target zones on the halfway line. The defending team scores a point by successfully passing into these zones after breaking the press.
- Variation 1 (The Long Switch): If the opposition overcommits to one side of the pitch to press, the Center Back or CDM can play a long, diagonal switch to the opposite Fullback to instantly break the lines.
Age Adaptations
- Under 10s / Under 12s: Focus heavily on the technical aspects: receiving on the back foot, accurate passing, and basic spacing. Reduce the pressure to allow them to find success. Use smaller areas if necessary.
- Under 14s / Under 16s: Introduce the concept of "third man runs" and emphasize the speed of transition. The pressure should be realistic and intense.
- Open / Senior: Focus on the tactical nuances: reading the specific pressing triggers of the opposition, utilizing the Goalkeeper as a true 11th outfield player, and executing complex variations based on the opponent's defensive structure.