Mastering the Slip Cordon: Field Setup and Catching Tactics
Learn how to correctly set up a professional slip cordon, optimize fielder geometry for edge trajectories, and adapt catching fields for different pitch conditions.

Equipment Needed
1. Overview
The slip cordon is the most critical attacking field placement in cricket, particularly against the new ball or on pitches offering seam movement and bounce. The primary objective of this set play is to maximize the chances of dismissing the batsman through caught-behind edges. A well-organized slip cordon not only creates direct wicket-taking opportunities but also exerts immense psychological pressure on the batsman. This resource provides coaches with the precise geometric setup required for an effective slip cordon, detailing fielder spacing, depth alignment, and movement mechanics.
2. Setup

Setting up an effective slip cordon requires precise spatial awareness and an understanding of edge trajectories. The setup involves the wicketkeeper (WK) and up to four slip fielders, plus a gully.
Equipment Needed
- Standard cricket ball (preferably a new ball to simulate maximum swing/seam)
- Stumps and bails
- Measuring tape (optional, for demonstrating precise gaps during training)
- Slip catching cradle or Katchet board (for catching practice drills)
Pitch and Field Setup
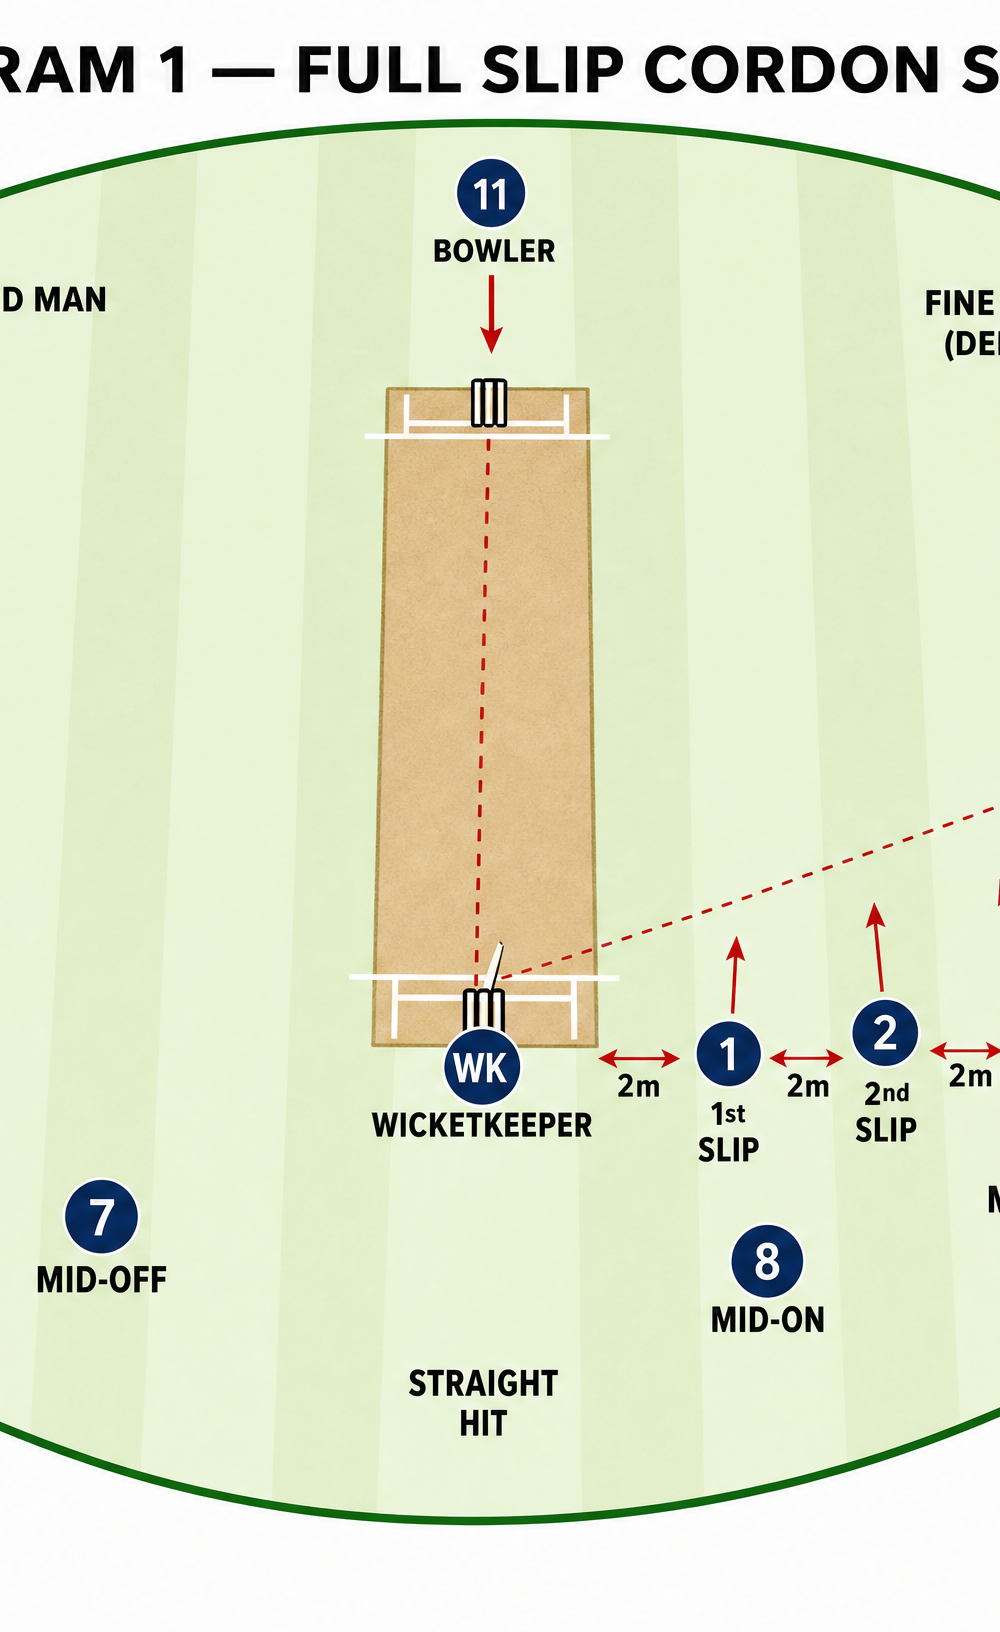
Ensure the pitch is marked with standard crease lines. The setup is oriented from the perspective of the bowler running in to bowl. The slip cordon is positioned on the off-side of the batsman.

Player Positions
- Wicketkeeper (WK): Positioned directly behind the stumps. Depth depends on the bowler's pace (typically 15-20 meters back for fast bowlers).
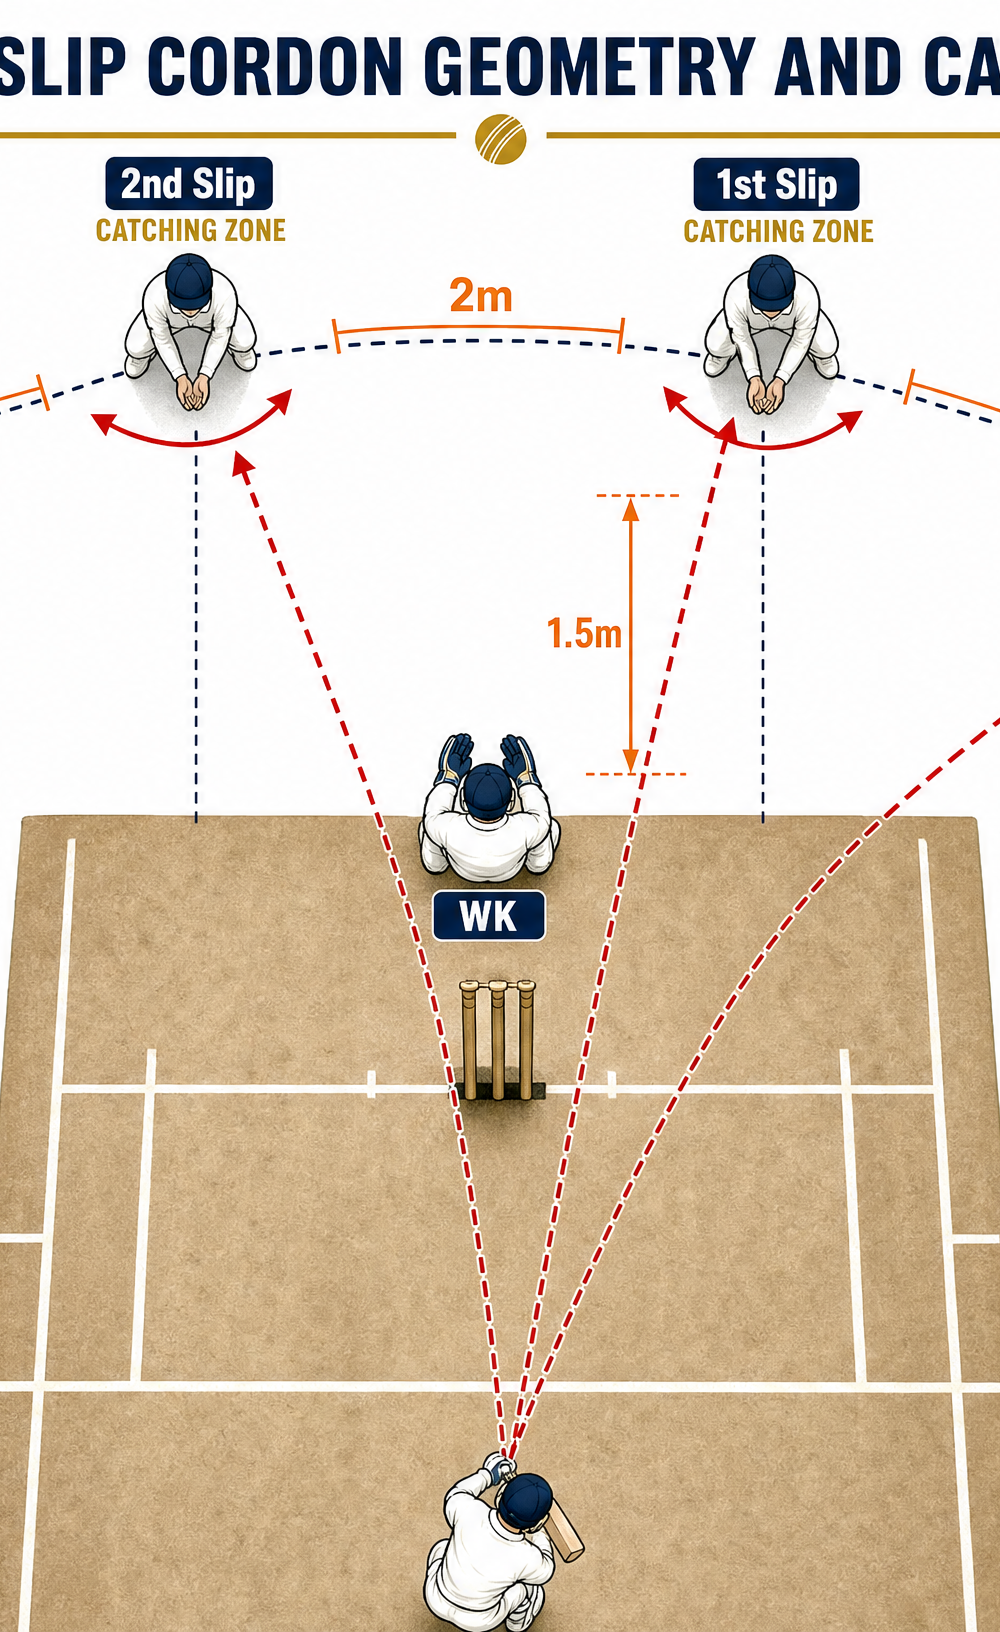
- 1st Slip: Positioned approximately 2 meters to the off-side of the WK. Crucially, 1st slip must be staggered slightly deeper (approx. 1.5 meters) than the WK to allow the WK an unimpeded view and first right of refusal on edges passing between them.
- 2nd Slip: Positioned 2 meters to the off-side of 1st slip, staggered slightly deeper again.
- 3rd Slip: Positioned 2 meters to the off-side of 2nd slip, continuing the staggered arc.
- Gully: Positioned significantly wider and squarer (approx. 45 degrees from the pitch), designed to catch thicker edges or square cuts played in the air.
3. Step-by-Step Instructions

Follow these steps to deploy and manage the slip cordon during a match or training session:
- Establish the Anchor: The WK takes their position based on the bowler's pace. This sets the baseline depth for the entire cordon.
- Set the 1st Slip: The 1st slip takes their position 2 meters wide of the WK and steps back 1.5 meters to create the stagger. They must ensure they can see the outside edge of the bat without being blocked by the WK.
- Build the Arc: The 2nd and 3rd slips align themselves using the 1st slip as a reference. Each player maintains a 2-meter gap and steps slightly deeper to form a continuous curved arc that matches the natural trajectory of a deflected ball.
- Position the Gully: The gully fielder takes a position squarer of the slips, adjusting their depth based on the pitch bounce. On bouncy pitches, gully drops deeper; on low pitches, they stand closer.
- Assume the Stance: As the bowler begins their run-up, all slip fielders adopt a relaxed, athletic crouch. Weight should be on the balls of the feet, hands resting lightly on the knees or hanging loose, eyes focused on the edge of the bat.
- React and Move: As the ball is bowled, fielders stay low. If an edge occurs, the fielder in the designated catching zone moves laterally to intercept the ball, ensuring soft hands upon impact.
4. Key Coaching Points

- The Staggered Arc: The cordon must form a curve, not a straight line. This geometry ensures that thicker edges, which travel faster and wider, reach the wider slips at a catchable height.
- Spacing is Critical: The 2-meter gap between fielders is non-negotiable. If fielders stand too close, they risk colliding or confusing whose catch it is. If too wide, catchable edges will pass through the gaps.
- Stay Low: Fielders must stay in their crouch until the ball has passed the bat or an edge is induced. Rising too early is the most common cause of dropped catches in the slips.
- Soft Hands: When catching, fielders should 'give' with the ball, pulling their hands back slightly upon impact to absorb the force and prevent the ball from bouncing out.
- Clear Communication: Establish rules for balls that go exactly between two fielders. Typically, the fielder moving to their preferred side (usually the right hand for right-handers) takes priority, or the WK calls it early.
5. Common Mistakes
- Standing in a Straight Line: Failing to stagger the depth results in wider slips standing too close to the bat, giving them insufficient reaction time for fast, thick edges.
- Rising Before the Ball is Played: Fielders who stand up as the ball is bowled lose their center of gravity and cannot react quickly to low catches.
- Hard Hands: Snatching at the ball instead of letting it come into the hands leads to dropped catches.
- Encroaching on the WK's Space: 1st slip standing too close or too shallow, blocking the WK's view or interfering with their catching zone.
6. Variations & Progressions

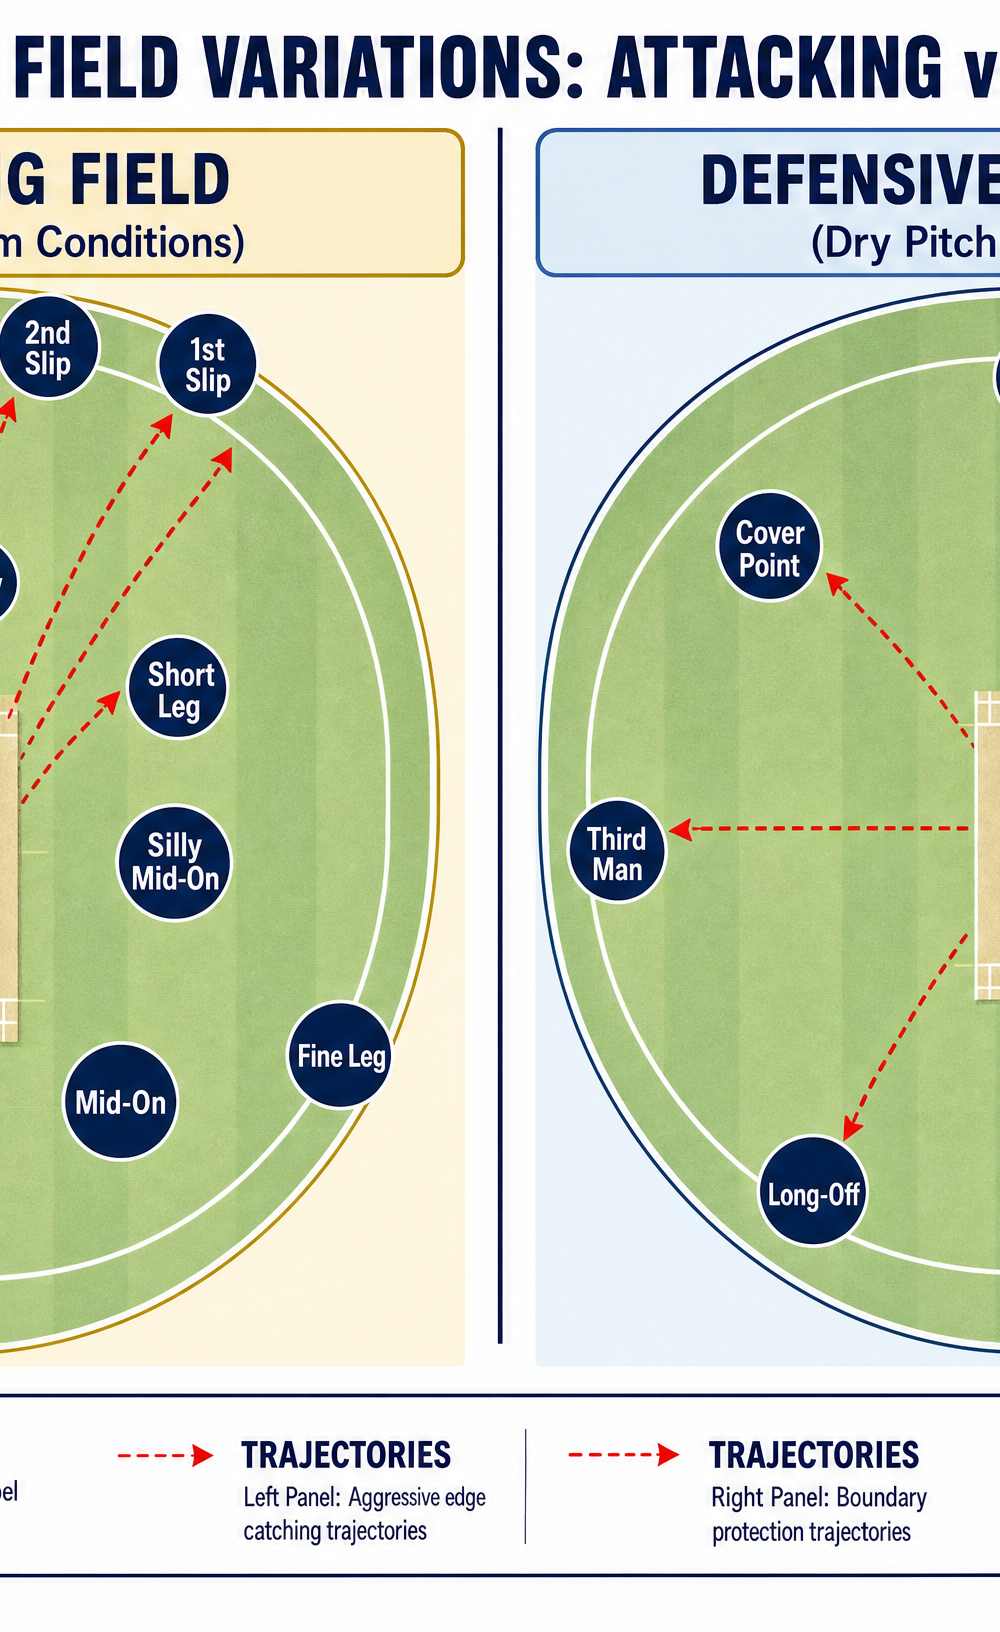
Attacking vs. Defensive Variations
Depending on the match situation, the pitch conditions, and the bowler, the field setup must adapt.
- Attacking Field (New Ball/Seam): Utilize a full cordon (3-4 slips + gully) to maximize catching opportunities while the ball is hard and moving. Leave gaps in the outfield to invite the drive.
- Defensive Field (Old Ball/Flat Pitch): Reduce the cordon to 1 or 2 slips. Move the extra fielders to run-saving positions (e.g., Cover, Mid-Wicket) to build pressure through dot balls when edges are less likely.
- Spin Bowling Setup: For spinners, the slip (usually just one) stands much closer and squarer, often reacting to finer edges or deflections off the WK's pads.
7. Age Adaptations

- Under 10s / Under 12s: Focus purely on the basic catching technique and the concept of backing up. Use a single slip or WK only, as true edges are rare and safety is paramount. Use softer balls for catching practice.
- Under 14s: Introduce a 2-slip cordon. Focus on the correct stance and the concept of spacing. Emphasize staying low.
- Under 16s & Open: Implement the full staggered arc. Introduce complex scenarios like adjusting depth for different bowlers and pitches. Practice high-speed reaction catching using specialized equipment.