First Phase Attack: The Switch and Wrap
A dynamic first-phase attacking move designed to manipulate the defensive line, creating space out wide through a dummy switch and an overlapping fullback.

Equipment Needed
First Phase Attack: The Switch and Wrap
1. Overview
The 'Switch and Wrap' is a classic first-phase attacking move executed directly from a set-piece (scrum or lineout) or a stable midfield ruck. Its primary goal is to manipulate the opposition's defensive line speed and spacing. By committing the interior defenders with a hard line from the fly-half (10) and a sharp cut-back angle from the inside centre (12), the attack forces the defence to condense. This sudden compression creates crucial space in the wide channels, which is then exploited by a looping fullback (15) joining the line at pace.
This play is highly effective against aggressive, rushing defences that look to shut down the midfield early. It requires precise timing, accurate passing, and committed decoy running to be successful.
2. Setup
Pitch Location: Best utilized between the 22m and halfway line, ideally from a midfield position to provide attacking options on both sides, though it can be run effectively from a wider breakdown.
Player Positioning:
- 9 (Scrum-half): Positioned at the base of the ruck/scrum, ready for a rapid clearance pass.
- 10 (Fly-half): Standing relatively flat, approximately 8-10 meters deep, ready to take the ball on the gain line.
- 12 (Inside Centre): Aligned slightly deeper and wider than the 10, preparing for an aggressive switch angle.
- 13 (Outside Centre): Holding a wider position, running an 'unders' line to hold the opposing 13.
- 14 (Right Wing): Maintaining maximum width on the touchline to stretch the defence.
- 15 (Fullback): Positioned deep, anticipating the loop around the 12 and 13.

3. Step-by-Step Instructions
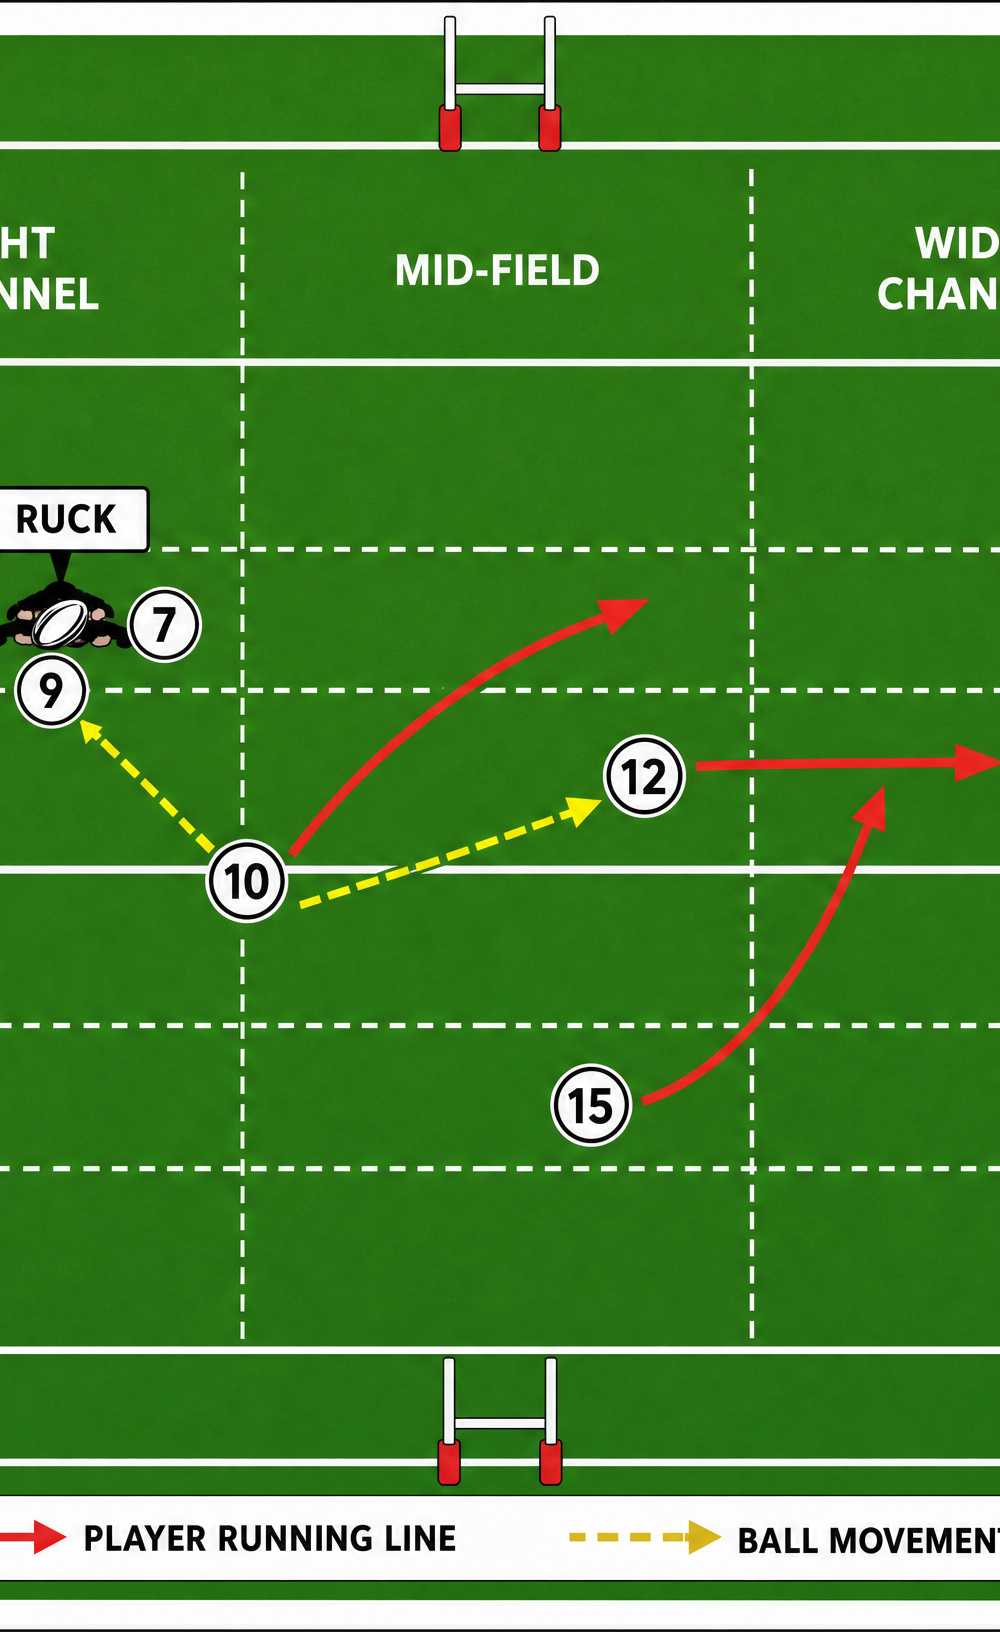
- The Delivery: The 9 delivers a fast, accurate pass to the 10, who is already moving forward at pace.
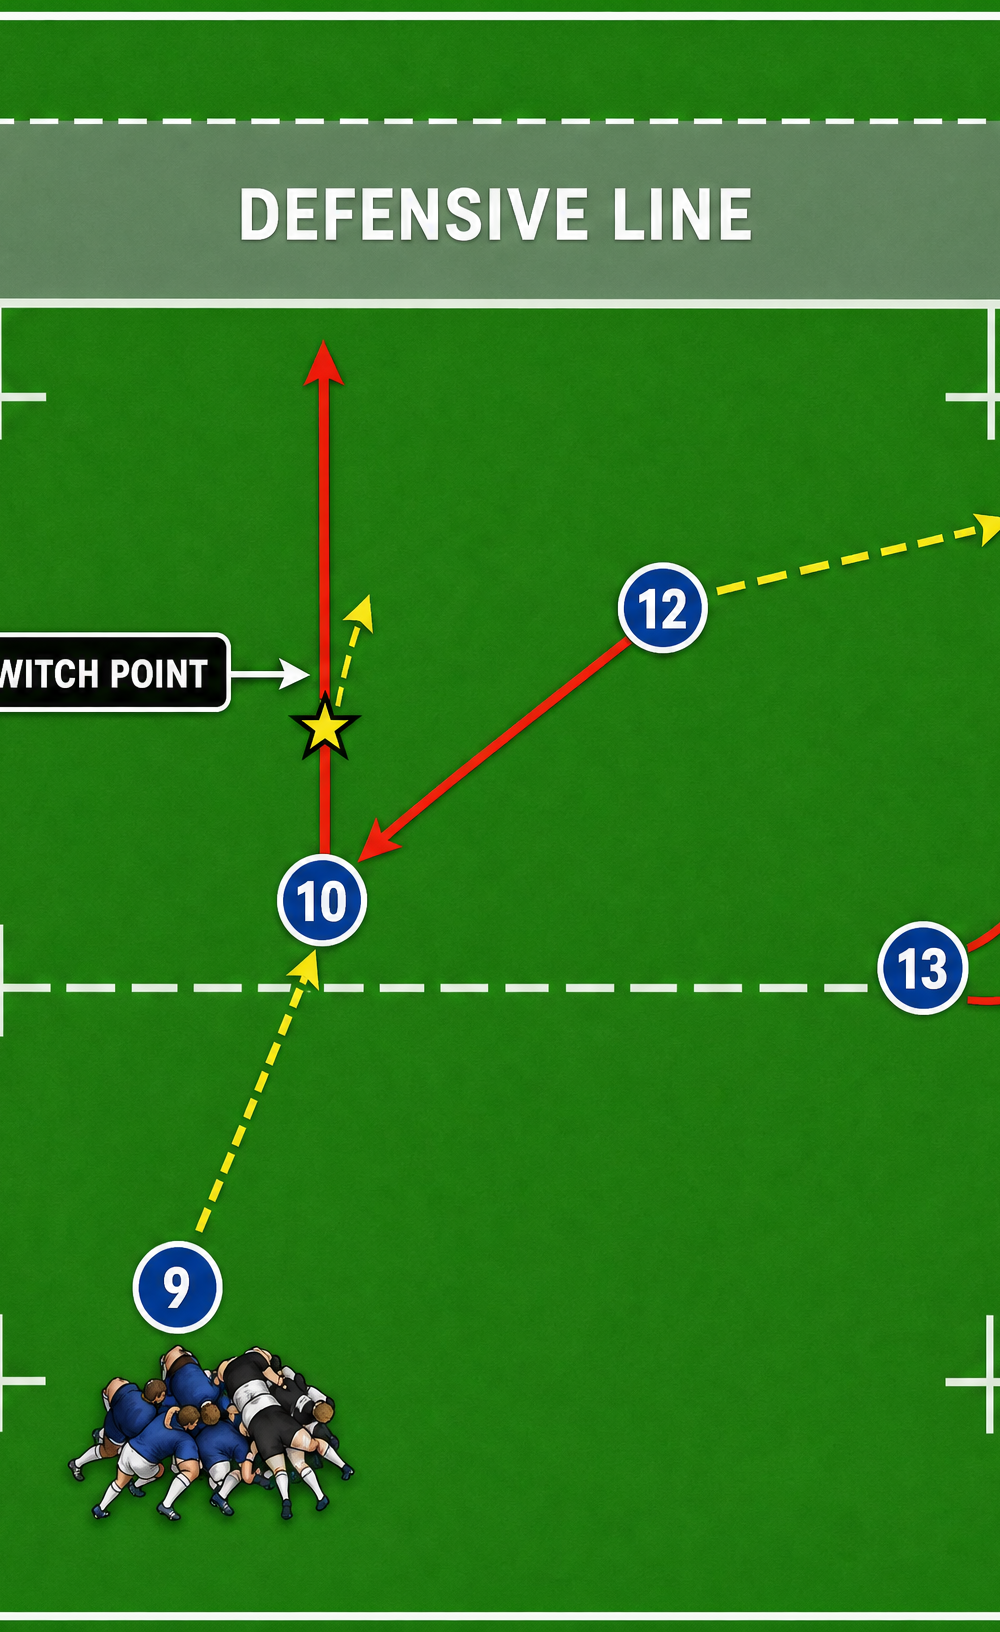
- The Commitment: The 10 catches the ball and attacks the defensive line squarely, threatening the gap between the opposition 10 and 12. The 10 must carry the ball in two hands to maintain the threat of a pass or a run.
- The Switch Angle: As the 10 approaches the defensive line, the 12 accelerates, cutting a sharp angle back towards the 10's inside shoulder. This is the 'switch' element, designed to draw the opposition 12 inward.
- The Decision (Dummy or Give): The 10 executes a convincing dummy pass to the 12 on the switch. The 12 must run their line as if they are receiving the ball, loudly calling for it to sell the deception.
- The Wrap: While the 10 and 12 execute the switch action, the 15 is accelerating from deep, looping around the back of the 12 and 13.
- The Execution: After selling the dummy switch to the 12, the 10 pulls the ball back and delivers a flat, fast pass behind the decoy runners to the looping 15, who hits the line at full speed in the wider channel.
- The Finish: The 15 now has a numerical advantage out wide, with the 13 and 14 in support, ready to exploit the space created by the condensed interior defence.
4. Key Coaching Points
- Squaring Up: The 10 must attack the line squarely. Drifting sideways before the pass allows the defence to slide easily and negates the space created by the switch.
- Convincing Decoys: The 12 must run their switch line with 100% commitment, demanding the ball. If the decoy isn't believable, the defence won't bite.
- Timing of the Loop: The 15 must time their run perfectly. Arriving too early means they have to slow down and lose momentum; arriving too late means the 10 gets tackled before the pass can be made.
- Depth of the Pass: The pass from 10 to 15 must be flat enough to challenge the gain line but deep enough to clear the rushing defenders who may have bitten on the dummy switch.
- Communication: Clear, concise calls are essential. The 10 must dictate the play, and the 12 and 15 must communicate their readiness.
5. Common Mistakes
- 10 Drifting: The fly-half drifts across the pitch instead of attacking the line, making it easy for the defence to drift with them.
- Lazy Decoy Lines: The 12 jogs through the switch line, failing to attract any defenders, leaving the 10 isolated.
- Poor Pass Execution: The 10 fails to sell the dummy or throws a poor pass to the 15, either too high, too low, or behind the runner.
- 15 Arriving Too Early: The fullback gets ahead of the play, forcing the 10 to throw a forward pass or take the tackle.
6. Variations & Progressions
- The 'Give' Option: If the defence reads the dummy and stays wide, the 10 can actually give the ball to the 12 on the switch, exploiting the gap created by the drifting defence.
- Adding a Forward Pod: Incorporate a pod of forwards running hard lines off the 9 or 10 to further compress the defence before executing the switch and wrap.
- The 'Inside Ball': Instead of passing wide to the 15, the 10 can look for an inside ball to a trailing forward or the blindside winger coming off their wing.
7. Age Adaptations
- Under 10s/12s: Focus on the basic switch first. Once the timing of the switch is mastered, introduce the concept of the fullback joining the line, but keep the passing simple and direct.
- Under 14s/16s: Introduce the dummy switch and the wrap. Emphasize the importance of squaring up and running convincing decoy lines. Practice the play against a live, albeit controlled, defence.
- Open/Senior: Execute the full play at game speed with complex variations. Focus on reading the defence and making the right decision (dummy or give) under pressure.