Slalom Dribble & Precision Finishing
Develop close ball control, agility, and clinical finishing under pressure with this essential attacking drill.
Equipment Needed
1. Overview
The Slalom Dribble & Precision Finishing drill is a foundational attacking exercise designed to improve a player's close ball control, agility, and ability to transition seamlessly from dribbling into a clinical finish. By simulating the tight spaces often encountered in the final third, this drill forces players to keep their heads up, maintain their balance, and strike the ball cleanly under simulated pressure. It is highly effective for forwards, wingers, and attacking midfielders, but serves as an excellent technical exercise for all outfield players.
2. Setup
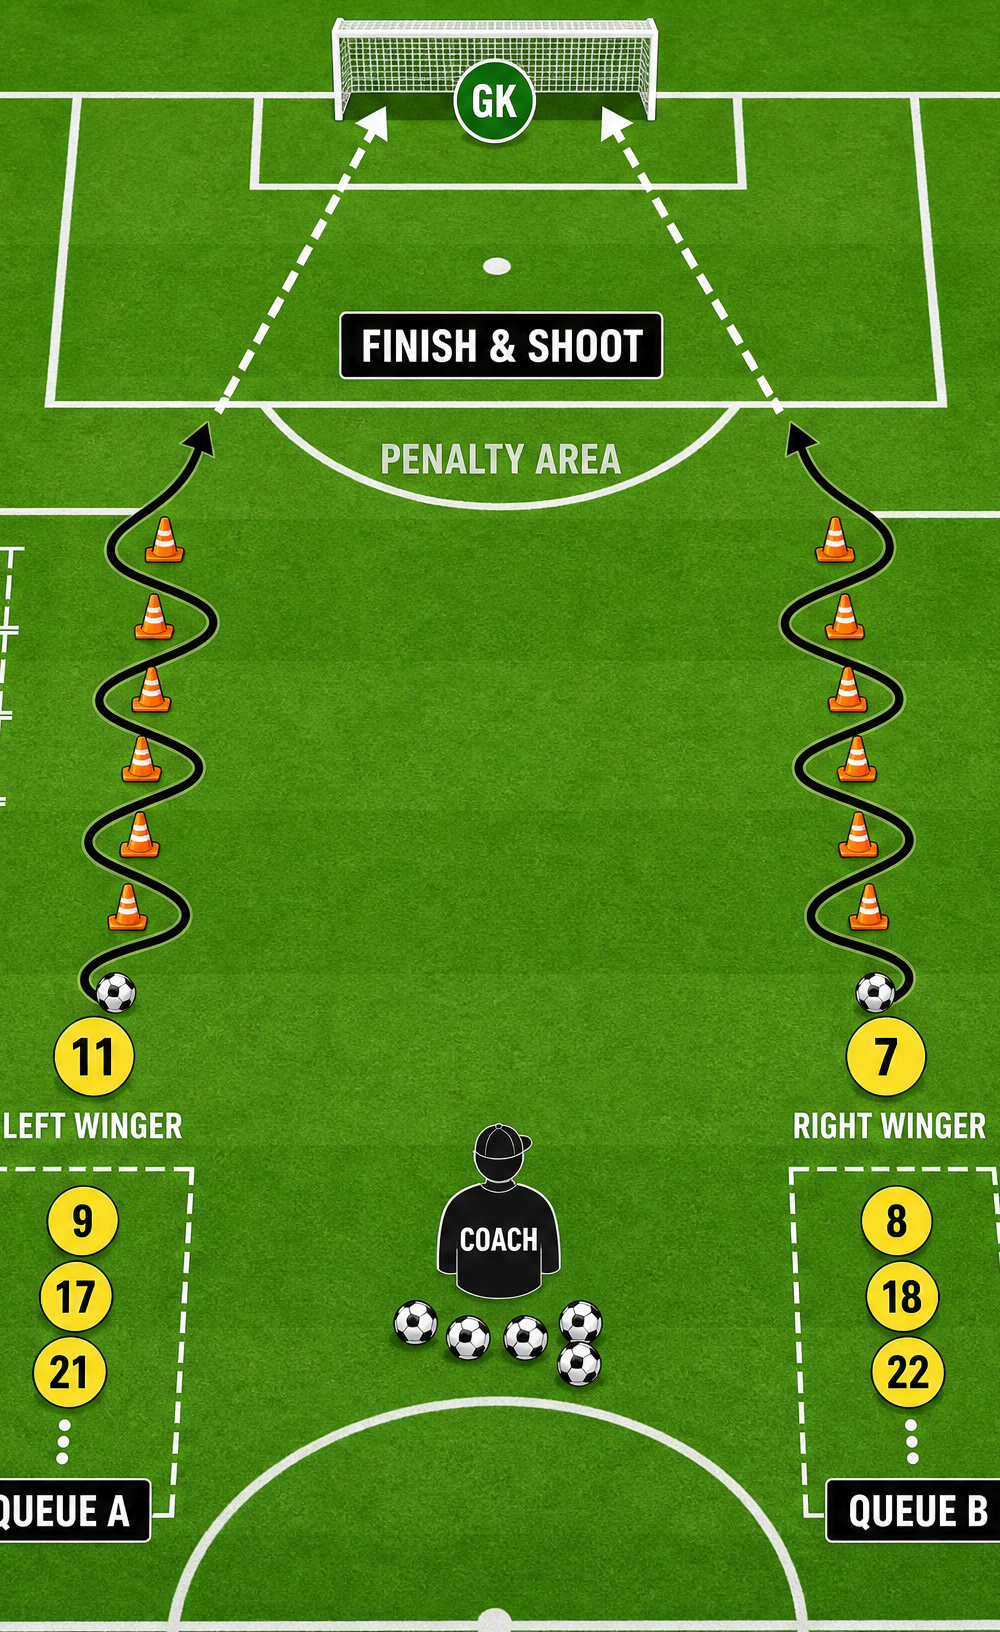
Proper setup is crucial for maximizing repetitions and ensuring the drill flows smoothly.
Pitch Area: Attacking third of a standard football pitch (approx. 30m x 40m).
Equipment Needed:
- 1 Full-size goal
- 6-12 Training cones (depending on variations)
- Minimum of 8-10 footballs
- 1 Goalkeeper
Player Positions:
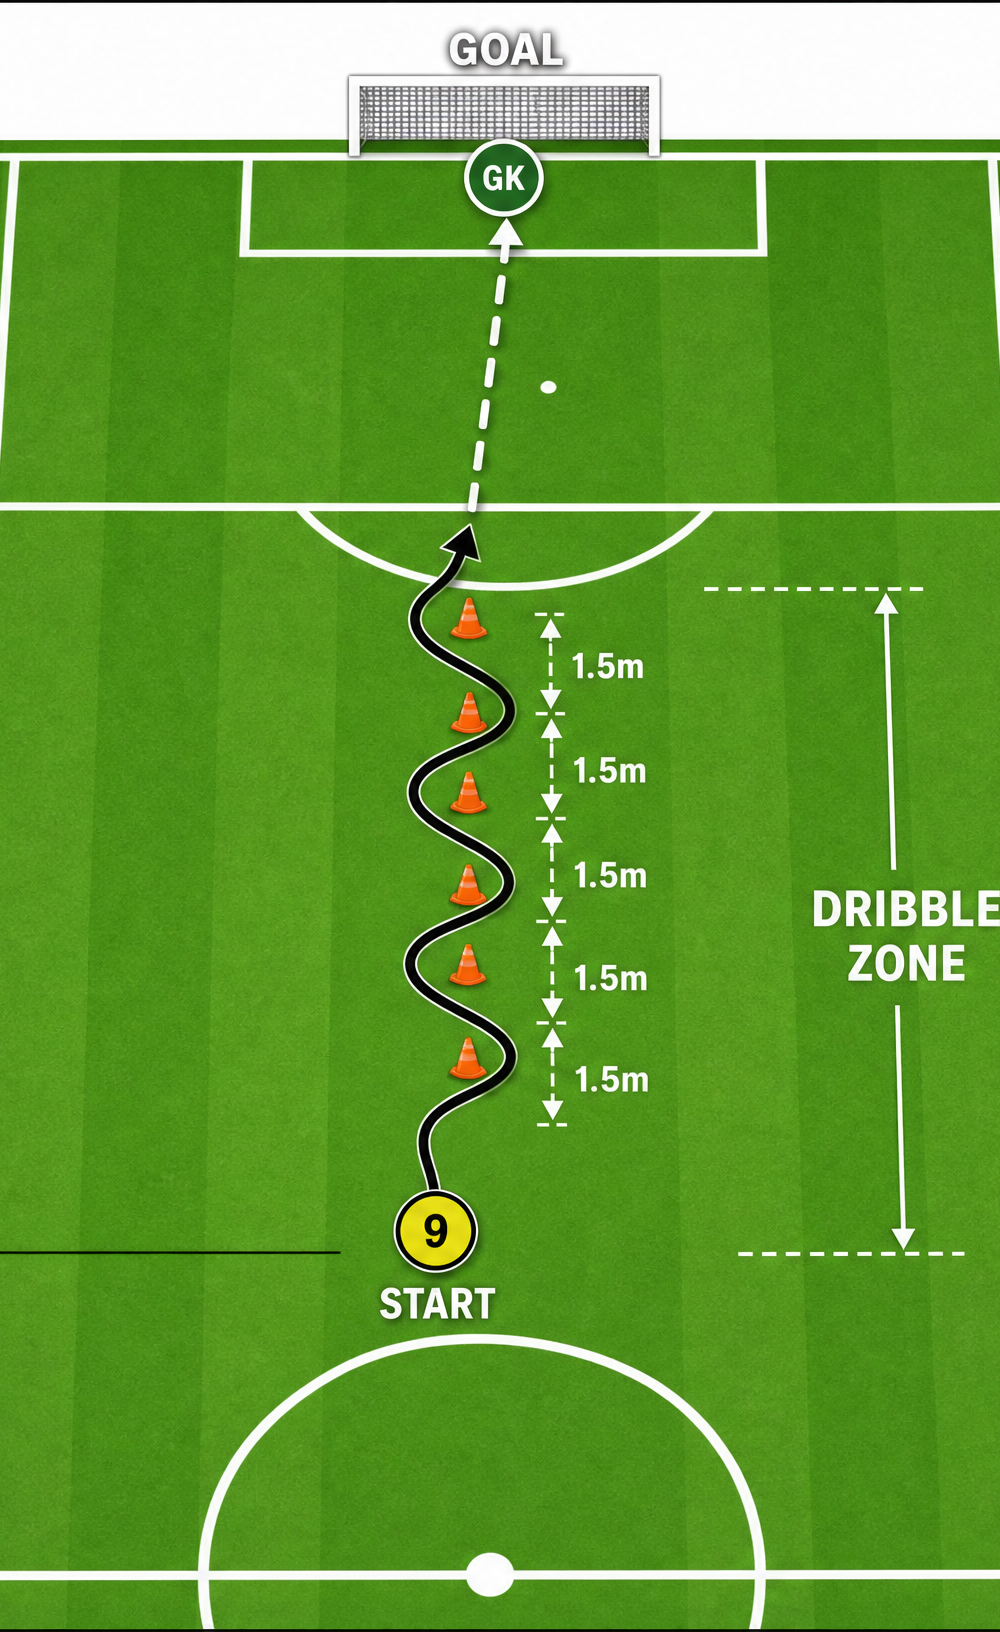
- Set up a straight line of 6 cones spaced exactly 1.5 metres apart, starting 25 metres from the goal line and leading straight towards the penalty area.
- The starting position is at the first cone (25m out).
- The finishing zone is immediately after the final cone, right on the edge of the penalty area (approx. 16-18m from goal).
- The Coach stands near the starting position with a supply of footballs to keep the drill moving quickly.
3. Step-by-Step Instructions
- Starting Position: The active player (e.g., the Striker '9') starts at the first cone with a football at their feet. The Goalkeeper ('GK') is set in the goal.
- The Slalom: On the coach's whistle, the player dribbles through the cones using a slalom motion. They must weave in and out of every cone, keeping the ball as close to their feet as possible.
- Touch and Control: Players should be encouraged to use both the inside and outside of both feet to navigate the tight spaces between the 1.5m cones.
- The Exit Touch: As the player rounds the final cone (at the edge of the penalty area), they must take a deliberate, slightly heavier touch out of their feet to set up the shot.
- The Finish: Without breaking stride, the player strikes the ball towards goal. The focus should be on accuracy over pure power, aiming for the bottom corners.
- Reset: The player immediately jogs to retrieve their ball (if missed) or joins the back of the queue, while the next player steps up to start.
4. Key Coaching Points
- Close Control: The ball should never be more than half a metre away from the player's feet during the slalom. Emphasize taking many small touches rather than a few large ones.
- Head Up: Players must scan the field. While they need to look at the ball, they should frequently glance up to assess the goalkeeper's positioning before the final shot.
- Use Both Feet: Ensure players are not overly reliant on their dominant foot. The most effective slalom uses the inside and outside of both the left and right foot.
- The Setup Touch: The touch after the final cone is the most important part of the drill. It must be perfectly weighted—far enough out of the feet to allow a full swing, but close enough to prevent a defender (or advancing GK) from intercepting.
- Clinical Finishing: Encourage players to pick a spot (e.g., bottom left corner) and pass the ball into the net rather than just smashing it blindly.
5. Common Mistakes
- Looking Down: Players staring entirely at the ball and losing spatial awareness, resulting in a rushed or inaccurate shot.
- Heavy Touches in the Slalom: Taking touches that are too big, forcing the player to reach for the ball and lose their rhythm and balance.
- Decelerating Before the Shot: Slowing down significantly after the last cone instead of accelerating into the finish.
- Leaning Back: Leaning backward when striking the ball, causing the shot to fly over the crossbar.
6. Variations & Progressions
To keep the drill challenging and engaging, introduce the following progressions:
- Dual Lanes (Competitive): Set up two parallel slalom courses. Two players race through the cones simultaneously and compete to score first. This adds game-realistic pressure and forces quicker decision-making.
- Weak Foot Only: Mandate that the entire slalom and the final shot must be executed using only the player's weaker foot.
- Added Defender (Passive to Active): Place a coach or a passive defender at the end of the cones. The player must perform a specific skill move (e.g., a step-over) to beat the defender before shooting.
7. Age Adaptations
- Under 8 - Under 10: Increase the distance between the cones to 2 or 2.5 metres to allow for looser control. Focus heavily on basic dribbling mechanics rather than shooting power.
- Under 12 - Under 14: Keep the 1.5m cone spacing but introduce time limits (e.g., complete the slalom and shoot within 5 seconds).
- Under 16 - Open (Seniors): Decrease cone spacing to 1 metre for extreme close control. Introduce the dual-lane competitive variation and demand high-intensity, match-speed execution.